Getting Ready for Incubation
- Before setting up, make sure the cement floor is flat. Tilt the incubator slightly forward (or backward for some models) to help with draining during cleaning. Leave about 2-3 meters of space in front of the industrial egg incubator door for easy access.
- Clean and disinfect the incubation room a week before starting. Scrub all corners well and use potassium permanganate and formaldehyde for disinfection.
- Check if the egg tray frames are sturdy and if any wires are out of place, broken, or bent. Take your time to inspect each one carefully.
- After closing the incubation room, make sure it’s tightly sealed. Look for any deformities in the walls, ceiling, or floor, and fix them promptly.
- About a week before starting industrial egg incubator, do a thorough check to ensure everything is securely installed, and all electrical connections are accurate and reliable.
- During the trial run, check the temperature, humidity, alarm, fan systems, and motor rotation. If everything works fine, run the trial for 1-2 days before starting incubation officially. Before putting eggs in, prepare by selecting them based on their appearance, using a light to check for any irregularities, and ensuring they’re properly warmed up and disinfected.
Managing the Incubation Process
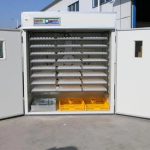
- When placing eggs in the trays, make sure they’ve been preheated and disinfected. Insert the trays into the egg racks inside the incubator, being careful to keep them balanced to prevent any tipping.
- Once the temperature is set and stable, try not to adjust it further. Right after starting, opening the door to add eggs can cause a temporary drop in temperature, but it should gradually return to normal. Keep an eye on the temperature and adjust if it deviates by more than 0.5°C. Also, ensure proper ventilation as the embryos develop by adjusting the exhaust port accordingly. However, don’t open it too much initially to avoid slow heating. The ideal temperature inside the incubator during days 1-19 of incubation is around 38°C.


Keeping the Right Humidity
The best relative humidity inside the incubator is between 53% and 57%. Check the dry and wet bulb thermometers on the incubator door regularly, and remember to change the water in the pans frequently.
Turning the Eggs
Turn the eggs every 2-3 hours, tilting them about ±45° each time. If you’re managing multiple incubators, try to have them all turn the eggs in the same direction. Keep a record of each turning.
Managing the Late Incubation Period
Around days 18-19 of incubation, move the embryos to hatching trays to continue until they hatch. When transferring them, raise the room temperature slightly and handle them gently. Around day 20.5, many chicks will start hatching. Remove chicks with dry feathers and collect eggshells when over 30% of the eggs have hatched. After all hatching is complete, thoroughly clean and disinfect the hatching trays and incubation room. Clean and sterilize the trays and water pans before using them again.
Incubation Temperature and Humidity for different eggs
Temperature in industrial egg incubator
Temperature is a critical factor for the development of poultry embryos. Different incubation stages require distinct temperature conditions:
Chicken Incubation Temperature
The incubation period is 21 days.
Days 1-6: 38.5°C
Days 7-14: 37.5°C
Day 15: 38°C
Days 16-21: 38-38.5°C
Duck Incubation Temperature
The incubation period is 28 days.
Days 1-7: 38.5°C
Days 8-16: 38.2°C
Day 17: 38.5°C
Days 18-28: 38°C
Goose Incubation Temperature
The incubation period is 30 days.
Days 1-8: 39°C
Days 9-18: 38°C
Day 19: 38.5°C
Days 20-30: 37.5-38°C
Humidity Environment in industrial egg incubator
Humidity plays a crucial role in maintaining the development of poultry embryos. Different incubation periods require varying relative humidity levels:
Early Incubation Stage: Relative humidity should be maintained at 60%-70%.
Later Incubation Stage : Relative humidity should be maintained at 50%-55%.
Hatching Stage: Relative humidity should be maintained at 65%-70%.